
When your computer’s fan regularly runs at maximum speed, it means that your CPU is running at full capacity or taking load. This will make the performance of your computer low, which can create lots of problems, also, if you are seeing this at the time of inactivity then it can create problems.
The CPU of your computer is also called as central processing unit or simply the processor, it is basically called as brain of the computer. When it must manage numerous processes or handle resource-intensive tasks, its utilization can surge, resulting in performance problems.
Solutions to Fix Your CPU 100% in Windows 10/11
Solution 1: Restart the WMI Provider Host
If your CPU usage is abnormally high, even in the absence of resource-intensive applications, this behavior is not typical. To investigate and address this, you can access the Task Manager.
Even though Microsoft has removed the official fix for this problem, there is a manual way available to resolve the high CPU usage issue.
You can follow the steps below:
Step 1: Search for “Services” and open Services application.
Step 2: Now from the Services window, look for “Application Management,” now right-click on it, and then select “Restart.”
Once the stps are completed the problem of high CPU usage should resolve.
If the problem persists, you can follow the next steps.

Solution 2: Use Event Viewer to Detect the problem
If the problem with WmiPrvSE.exe persists, you can pinpoint its source by leveraging the Windows Event Viewer. It’s possible that another system process is keeping the WMI provider host occupied, resulting in elevated CPU usage. Here’s how to address the issue of CPU usage hitting 100%:
Step 1: First right-click on the Start button and then open the “Event Viewer”.
Step 2: from the left-hand panel, Go to “Applications and Service Logs,” and the click on “Microsoft.” Afterward, click on “Windows,” followed by “WMI-Activity” and “Operational” in sequence to access them.
Step 3: You should now be able to identify recent Error entries by scrolling through the list of operational events. For each Error entry, take note of the ClientProcessId.
Note: Make sure you are checking new errors.
Now from the list of processes if you think that one is responsible then you can locate it in the Task Manager.

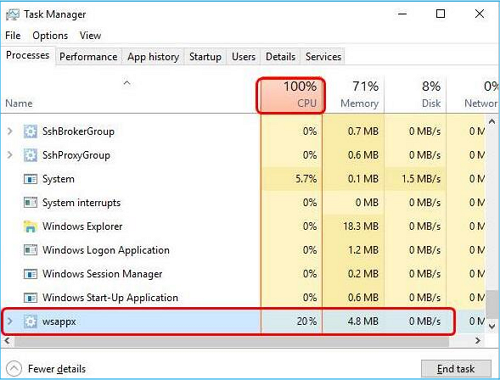
Solution 3: Kill the Processes that have High CPU Utilization
Task Manager will show you the status of all the processes of your computer you can kill the processes to free up the CPU.
To do so follow the steps below:
Step 1: Right-click on the Taskbar and then click on “Task Manager” to open it.
Step 2: Now click on the CPU tab from the processes section to arrange the processes according to CPU usage and now you can check what process has more usage.
Step 3: Now right-click on the process that is consuming a lot of CPU resources, and then click on “End task” to terminate the process.
Tip: Make sure that you are killing the normal process and not the system process that can make your computer go crazy.
Solution 4: Run an Antivirus Scan or disable the local Antivirus
For everyday computing needs, Windows Defender suffices as your security solution. Therefore, consider uninstalling any third-party antivirus software that may be negatively impacting your CPU performance.
Windows Defender hailed as one of the Best Antivirus Software options in 2019, can effectively safeguard your Windows devices. Let’s delve into more specifics:
Furthermore, high CPU usage issues can be triggered by viruses lurking on your computer. To address this, you can attempt to run an antivirus scan to identify potential viruses, spyware, or Trojans residing on your system. Should you uncover any malicious software during the scan, it is imperative to promptly remove them.
If no viruses are detected during the scan, proceed to explore the next solution.
Solution 5: Reset Your Power Plan Settings
The Power Options configuration plays a pivotal role in your PC’s performance. If your computer is currently set to the Power saver plan, especially if you’ve made custom adjustments, it can lead to increased CPU usage. To rectify high CPU usage, follow these steps:
Step 1: Open the Control Panel, select “Hardware and Sound,” and then click on “Power Options.”
Step 2: Now change the power option to the balanced “Balanced” option.

Step 3: Next, click on “Change plan settings”.
Step 4: You can also revert the changes by clicking on the “Restore default settings for this plan” and then clicking on OK.
By following these steps, you can reset your Power Plan settings, which should help alleviate the high CPU usage issue.

Solution 6: Adjust Registry Editor Settings
This particular concern may arise from Cortana’s behavior in Windows 10/11. Therefore, if you have enabled Cortana, you might find your CPU usage maxing out at 100%. If you infrequently utilize Cortana and suspect it’s the source of the issue, you can explore adjusting settings within the Registry Editor to potentially resolve the high CPU usage problem.
Follow the steps below to reduce CPU usage:
Note: Make sure that you have a backup of the registry so that you can revert the changes if anything goes wrong.
Step 1: First press the Windows logo key + R key to open Run.
Step 2: Now type “regedit” in the Run and then press Enter to open Registry Editor. If prompted click on “Yes”.
Step 3: Go to the following path:
HKEY_LOCAL_MACHINE\SYSTEM\CurrentControlSet\Services\TokenBroker
Step 4: Now Right-click on the “Start” from the right side and then click on “Modify…”.
Step 5: Now change the “Value data” to 4, and then click on “OK” button.
It’s worth noting that after implementing this change, some of Cortana’s features may be affected. If you frequently use Cortana, this solution may not be suitable for your needs. After making this adjustment, verify if the issue persists.

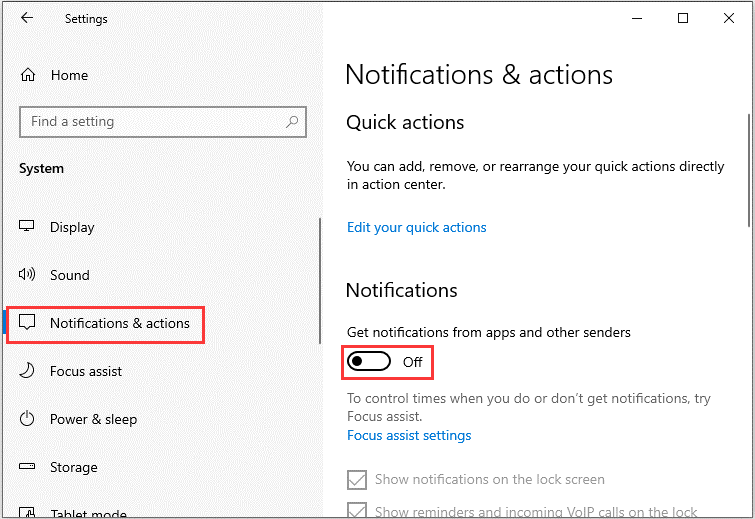
Solution 7: Disable Windows Notification Settings
The Windows notification settings on Windows 10/11 computers have the potential to cause CPU usage to spike to 100%.
You can follow the steps below to resolve the issue:
Step 1: First you have to click on Start, and then select “Settings”.
Step 2: Now select “System” and then click on “Notifications & actions” from the left side of the window.
Step 3: Now turn off “Get notifications from apps and other senders.”
By following these steps, you can potentially resolve the high CPU usage problem.
Solution 8: Perform a Computer Reset
If all other options fail then you have to reset your computer. Make sure to take a backup of your computer as resetting the computer will remove all the data and applications.
Verdict:
While pinpointing the precise causes of high CPU usage can be challenging, this compilation highlights some of the most common issues and provides corresponding solutions.